


Securing mobile applications is always different from any other type of application, considering the fact that the developer doesn’t have as much control on a client’s device. In this article, we will go into detail on the three most common patterns developers follow. Then, we will guide you through the steps of building an end-to-end biometric authentication in Mendix Native Mobile with Mendix 9.X.X using the most secure method. Mendix Native is a powerful and extendable application built using React Native, one of the most popular mobile platforms. It is highly recommended that you go through this document before completing this article.
1. The non-secure way
The most vulnerable point in this flow is caching credentials on the device. For example, using insecure storage like localStorage or SQLight might seem like an easy way out since it has all the actions out of the box. On the contrary, it’s extremely dangerous.
2. Using KeyChain/KeyStore way (good method)
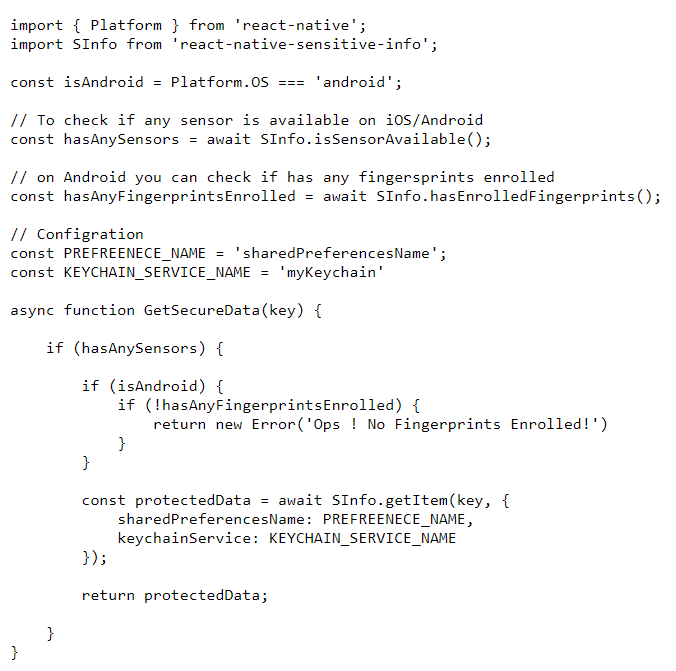
To make sure credentials are stored securely, the developer must utilize a native component called “Keychain” on IOS or “Keystore” on Android. The main purpose of it is to provide access and storage to credentials, as well as private keys and their corresponding certificate chains in a secure storage. One of the well structured react-native libraries that I recommend is “react-native-sensitive-info”. It successfully manages all data stored in Android Shared Preferences, iOS Keychain, and Windows Credentials. You can also set and obtain all keys/values using simple methods.
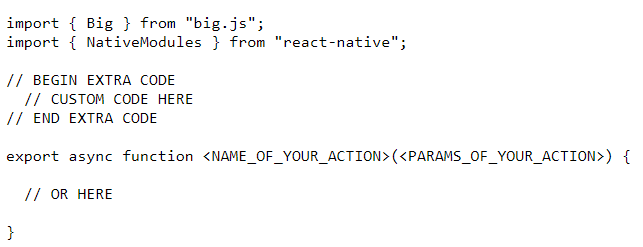
Here’s a quick tip. Install NPM modules inside your javascriptsource folder inside the module you created the action in using npm i react-native-sensitive-info. Whenever you are using an NPM module that requires native code, make sure it’s installed in the build package by cloning the repo, installing and linking it, then pushing the changes to github. Keep in mind that “Main Branch” is for your normal builds and “Dev Branch” is for your custom developer builds. This module works on Android and iOS and automatically switches between Face ID and Touch ID. It also provides methods to detect the hardware and biometric enrollment, helping you build a solid flow.
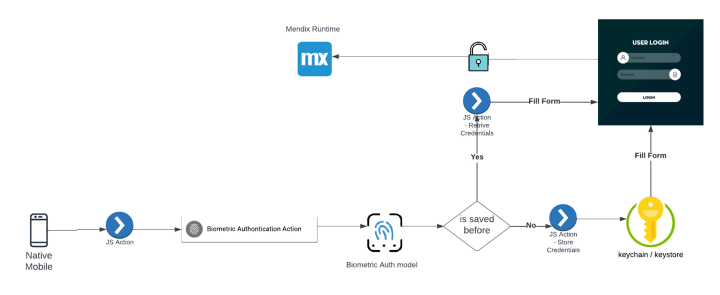
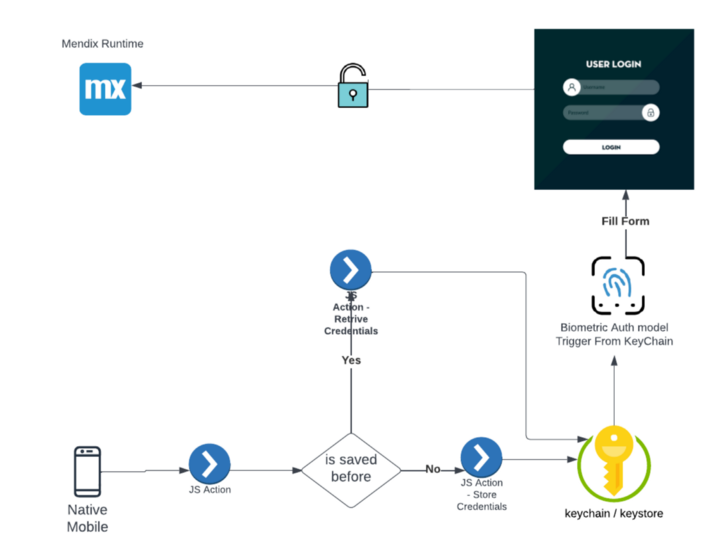
3. Moving Biometric Trigger Ownership (the preferred method)
The strongest design is asking the keychain to trigger the biometric. If releasing the credentials was successful, we can then use the same react-native module to do so. The good thing about this method is that it can’t be skipped when the device is rooted and the application is recompiled, as the action of triggering the biometric is not a separate function. In fact, it’s the retrieve/save action itself.

We enabled biometric on retrieval here by setting Touch ID to true and showing the Modal.
Read more about Access Control in IOS and Android to learn how to define rules like limiting access per device. This comes in handy if for example, someone restored the device from backup.